

HP 14s Battery Replacement Service in Singapore
Is your trusty HP 14s laptop no longer holding a charge? Are you constantly tethered to a power outlet, losing the very portability that makes a laptop essential? At Starlabs, we understand how frustrating a failing battery can be. This guide explains the common issues with HP laptop batteries and how our expert HP 14s battery replacement service can restore your device’s freedom and performance.
The HP Laptop Experience: A Blend of Power and Practicality
For decades, HP (Hewlett-Packard) has been a dominant name in the world of personal computing. Renowned for their vast range of devices, HP laptops are a common sight in Singaporean homes, offices, and classrooms.
- Pros: HP laptops are often praised for their affordability, wide availability, and diverse product lines that cater to everyone from casual users (HP Pavilion, HP 14s) to demanding professionals (HP Spectre, Envy). They offer reliable performance for everyday tasks.
- Cons: Like any electronic device, certain components are prone to wear and tear over time. While the processors and storage can last for years, the battery is a consumable part with a finite lifespan, often being one of the first components to show signs of age.
Understanding Your HP 14s: The Everyday Performer
The HP 14s, along with its close cousins in the Pavilion and basic HP series, is designed for reliability and everyday use. It’s a fantastic machine for students and professionals who need a lightweight, dependable laptop for browsing, document editing, and online meetings. However, its slim profile means the battery is constantly working to keep you powered up. After a couple of years of daily charge cycles, a decline in battery health is inevitable.
Is Your HP 14s Battery Failing? Common Signs & Frustrations
A dying battery doesn’t just happen overnight. It usually presents a series of warning signs that create growing frustration and unreliability. Do any of these sound familiar?
- It Won’t Last: The most obvious sign. Your laptop, which once lasted for hours, now dies in under an hour, forcing you to carry your charger everywhere.
- Sudden Shutdowns: The battery percentage seems fine, showing 30% or 40%, but then suddenly drops to zero and the device shuts down without warning, potentially causing you to lose unsaved work.
- The “Plugged-In Only” Problem: Your HP 14s works perfectly when connected to the charger but dies the instant you unplug it. Your laptop has effectively become a desktop.
- Failure to Charge: You plug it in, but the battery percentage refuses to climb, or you get a “plugged in, not charging” message.
- Physical Swelling: In serious cases, a failing lithium-ion battery can swell. This is a hazardous issue that can damage the trackpad, keyboard, or chassis from the inside. If you notice a bulge, you should stop using the laptop and seek a replacement immediately.
These issues transform a tool of freedom into a source of anxiety. You can no longer confidently take your laptop to a meeting or a café without hunting for a power socket.
Laptop Battery Replacement DIY Guide 🔋
This guide provides a detailed walkthrough for safely removing your old laptop battery and installing a new one. Before you begin, ensure you have a clean, well-lit workspace and the necessary tools.
Tools You’ll Need:
- A Phillips head screwdriver
- A plastic prying tool or spudger (to avoid scratching your laptop)
- A safe place to keep track of screws
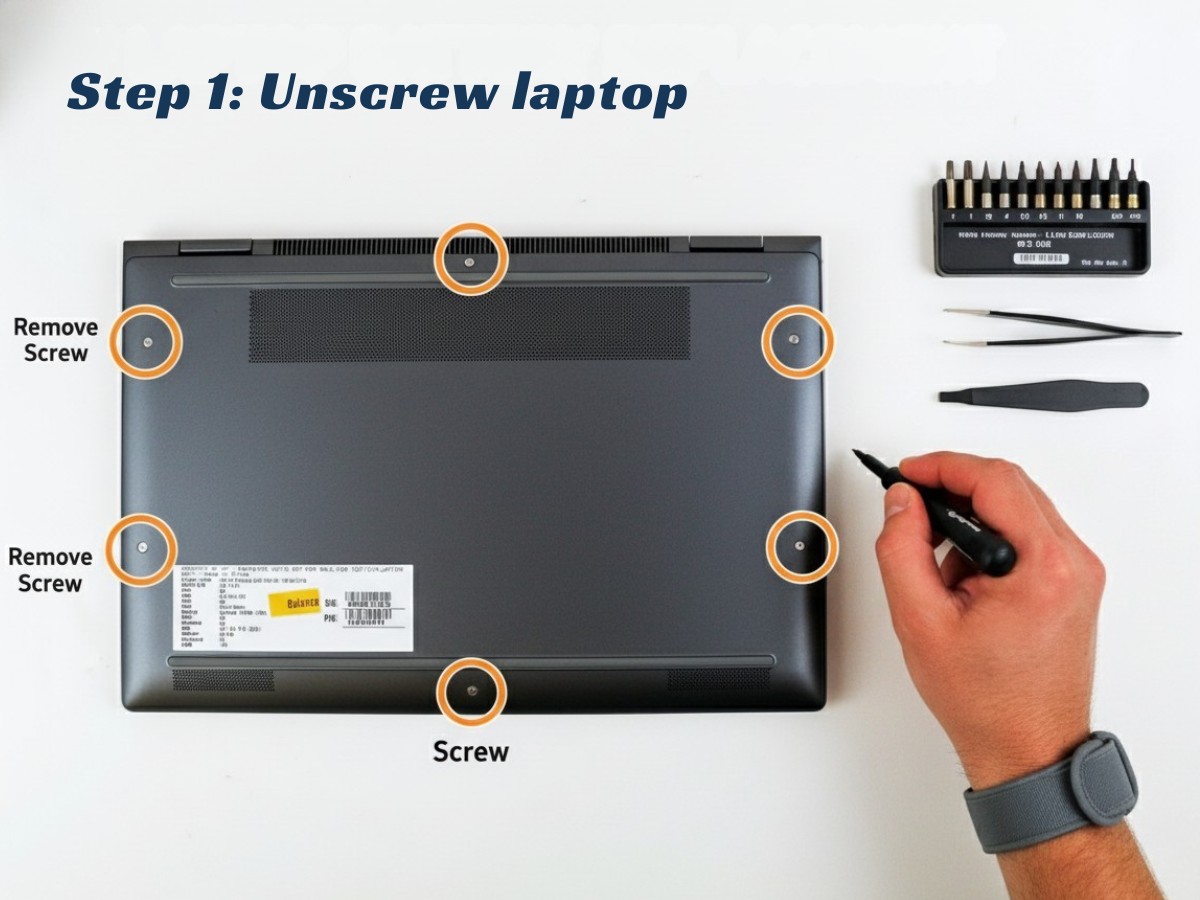
Step 1: Prepare and Open the Laptop
Safety first! Powering down completely is crucial to prevent electrical damage.
- Power Down: Completely shut down your laptop. Do not just put it to sleep. Unplug the charging cable and any other connected peripherals.
- Flip It Over: Close the laptop lid and place it upside down on a soft, non-scratch surface.
-
Remove Bottom Screws: Locate and unscrew the four Phillips screws holding the bottom cover in place.
- Remove the two shorter 3.2 mm screws near the hinge.
- Remove the two longer 7.2 mm screws near the front edge.
- Pro Tip: Keep these two sets of screws separate to avoid mixing them up during reassembly.
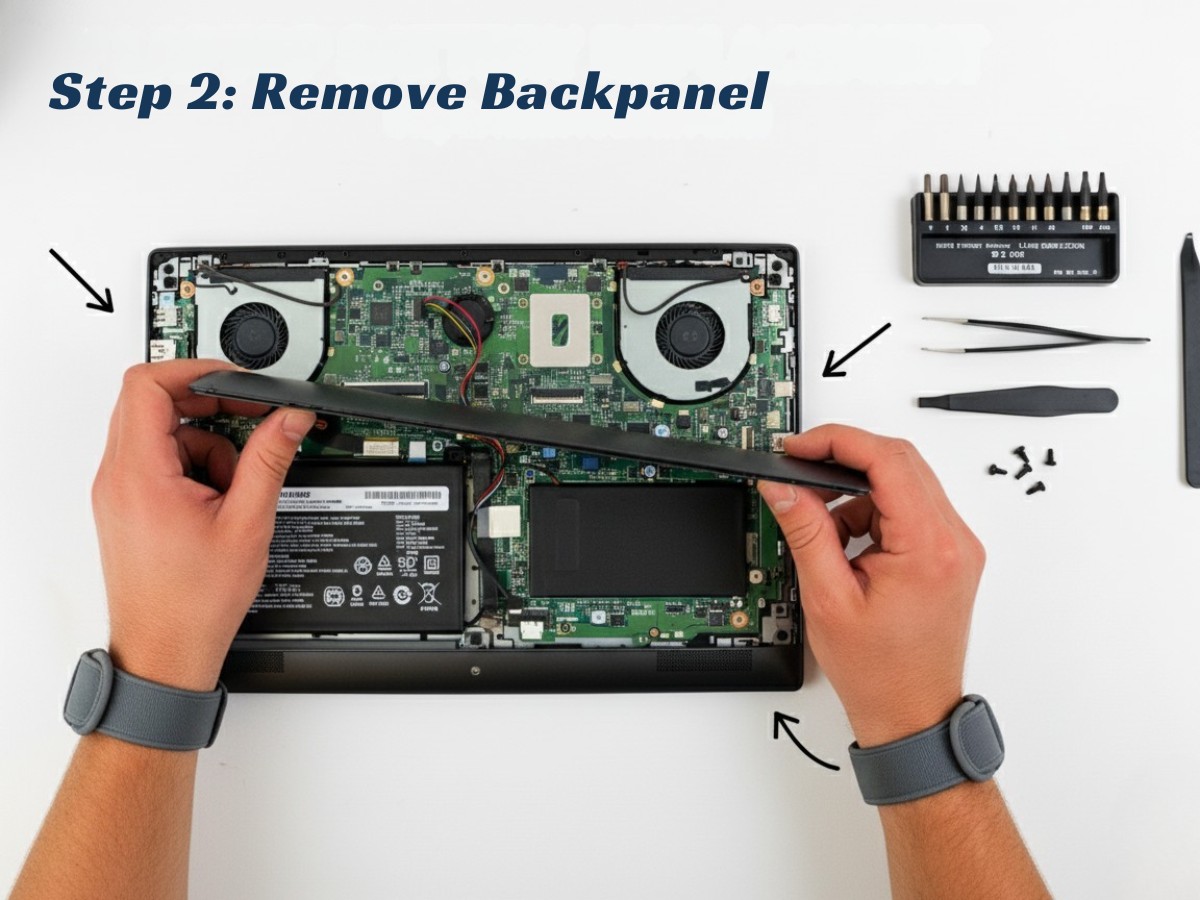
Step 2: Remove the Bottom Cover
This step requires a bit of patience. Go slowly to avoid breaking any plastic clips.
- Pry Open: Insert a plastic prying tool into the seam between the bottom cover and the main chassis. It’s often easiest to start at the corners near the hinge.
- Work Your Way Around: Gently slide the tool along the seam to release the plastic clips holding the cover in place. You will likely hear clicking or popping sounds as the clips disengage—this is normal.
- Lift the Cover: Once all the clips are loose, you can lift the bottom cover off and set it aside.
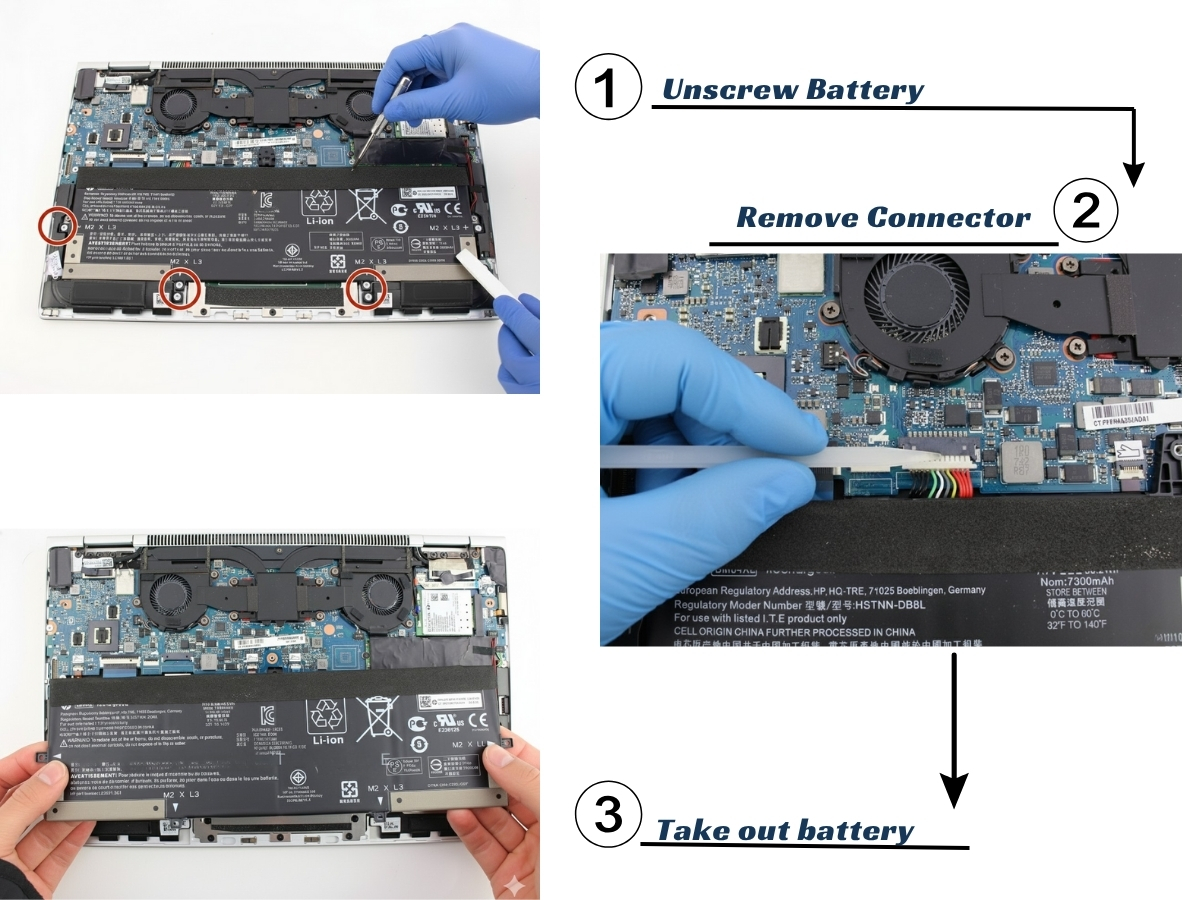
Step 3: Disconnect and Remove the Old Battery
Now that you’re inside, the battery will be the most prominent component.
- Unscrew the Battery: Locate and remove the five 3.7 mm Phillips screws securing the battery to the frame. Place these screws in a separate pile.
-
Disconnect the Connector: The battery is connected to the motherboard via a bundled cable with a small connector.
⚠️ Important: Do NOT pull on the wires themselves.
Use your plastic spudger or prying tool to gently push the connector horizontally, away from its socket on the motherboard. You can wiggle it from side to side to loosen it.
- Lift Out the Battery: Once it’s unscrewed and disconnected, you can carefully lift the old battery out of the laptop.
Step 4: Install the New Battery and Reassemble
You’re halfway there! Reassembly is just these steps in reverse.
- Position the New Battery: Carefully place your new battery into the same position as the old one.
- Reconnect the Connector: Align the battery connector with the socket on the motherboard and gently push it straight in until it’s fully seated.
- Secure the Battery: Re-insert the five 3.7 mm screws to hold the new battery in place.
- Replace the Bottom Cover: Position the bottom cover back onto the laptop and press down firmly along the edges to snap all the plastic clips back into place.
- Final Screws: Re-insert the four screws on the bottom, ensuring you use the shorter 3.2 mm screws by the hinge and the longer 7.2 mm screws at the front.
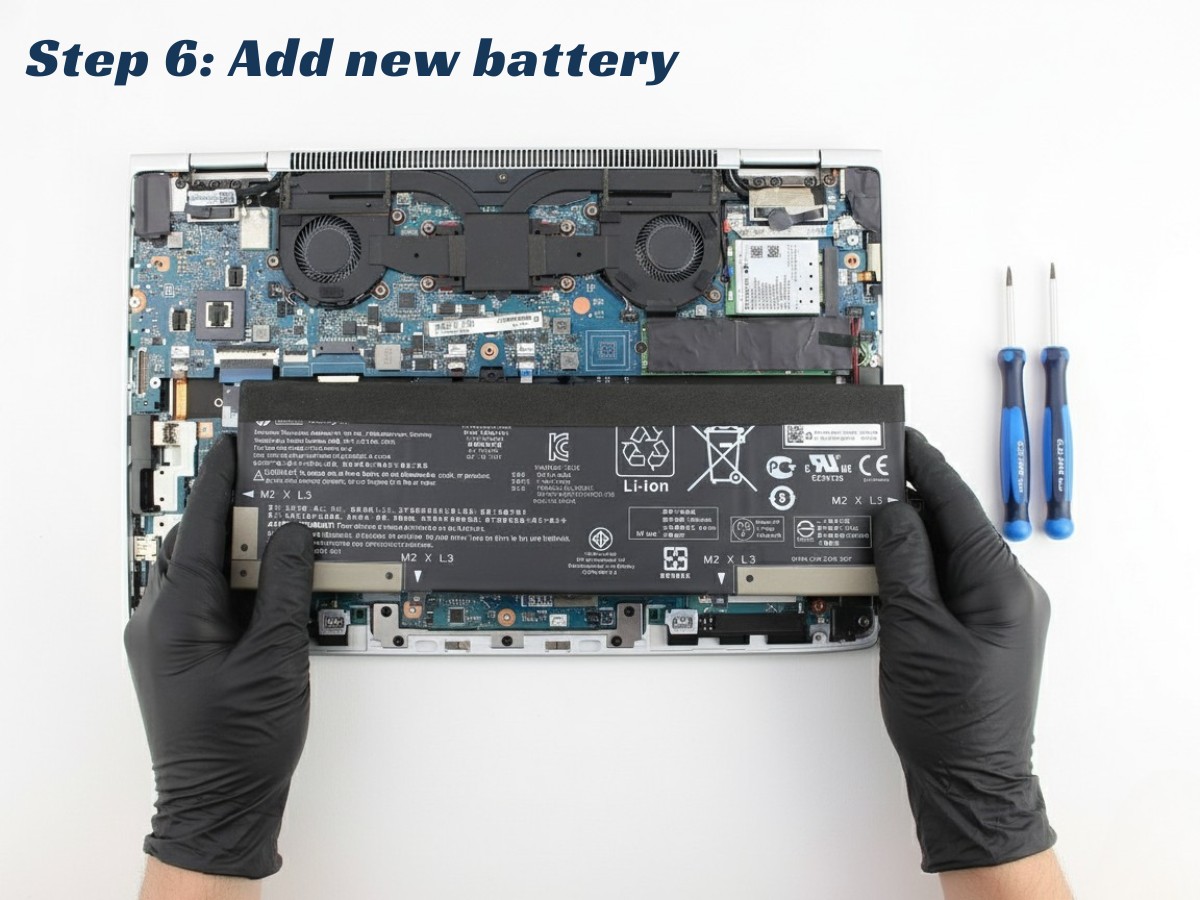
Once reassembled, you can plug in your laptop and power it on. It’s a good practice to fully charge the new battery before using it on battery power for the first time. Great job! 👍
The Starlabs Solution: Restoring Your HP 14s to Peak Condition
Don’t consider replacing your entire laptop just because the battery is failing! Starlabs offers a fast, affordable, and professional HP 14s battery replacement service that breathes new life into your machine.
Our process is simple and effective:
- Free Diagnosis: We first confirm that the battery is indeed the root cause of the problem.
- Expert Replacement: Our skilled technicians will carefully open your HP 14s, disconnect the old battery, and install a brand new, high-quality replacement. We use OEM-grade batteries that meet or exceed original specifications.
- Testing and Calibration: We ensure the new battery is recognized correctly by the system and holds a charge properly before handing it back to you.
The result? Your HP 14s will feel like new again. You can work, study, and browse for hours without being chained to the wall. Your laptop’s portability and your peace of mind will be fully restored.
Why Choose Starlabs for Your HP Battery Replacement?
- Fast, Same-Day Service: We know your time is precious. We stock batteries for popular models like the HP 14s and aim to complete the replacement on the same day.
- High-Quality Parts: We don’t use cheap, unreliable batteries. Our replacements ensure longevity and safety for your device.
- Warranty Included: We stand by our work. All our battery replacements come with a warranty for your confidence.
- Expert Technicians: Our team has extensive experience with HP laptops. Your device is in safe, professional hands.
Ready to unplug and get your freedom back? Contact Starlabs today to schedule your HP 14s battery replacement!