

HP Pavilion X360 Battery Replacement Service in Singapore
Is your versatile HP Pavilion X360 no longer a 2-in-1, but a “1-in-1″—stuck at your desk? Has the battery failed, leaving you tethered to a power outlet and destroying the “use-anywhere” flexibility you bought it for? At Starlabs, we get it. The whole point of an X360 is freedom. This guide explores the unique battery problems faced by 2-in-1 users and how our expert HP Pavilion X360 battery replacement service can bring back its “flip-and-go” power.
The HP Laptop Experience: A Blend of Power and Practicality
For decades, HP (Hewlett-Packard) has been a dominant name in the world of personal computing. Renowned for their vast range of devices, HP laptops are a common sight in Singaporean homes, offices, and classrooms.
- Pros: HP laptops are loved for their innovation, stylish designs, and excellent value. The Pavilion X360 line specifically is celebrated for bringing high-end convertible features to an affordable price point for students and creatives.
- Cons: The battery is always the first component to show its age. In a 2-in-1, the battery is used heavily (for streaming, drawing, notes) and its failure is felt more acutely as it grounds a device built for motion.
Understanding Your HP Pavilion X360: The Ultimate Flexible PC
The Pavilion X360 isn’t just a laptop. It’s your all-in-one device. You use it in:
- Laptop Mode: For typing essays and answering emails.
- Tent Mode: For watching movies on a plane or in bed.
- Stand Mode: For giving presentations or showing photos.
- Tablet Mode: For taking notes in class or drawing.
A failing battery makes all these extra modes useless. You can’t use it in tent mode if it has to be plugged in. You can’t use it as a tablet if it dies in 20 minutes. The battery isn’t just a part—it’s the component that enables the entire X360 experience.
Is Your Pavilion X360 Battery Failing? Common Signs & Frustrations
A dying battery doesn’t just happen overnight. It usually presents a series of warning signs that create growing frustration and unreliability. Do any of these sound familiar?
- It Won’t Last: The most obvious sign. Your X360, which once got you through a full day of classes, now needs a charger after one lecture.
- Drains Fast in Tablet/Touch Mode: The battery percentage plummets the moment you start using the touch screen or an active pen.
- Sudden Shutdowns: The battery percentage seems fine, showing 30% or 40%, but then suddenly drops to zero and the device shuts down without warning, losing your unsaved notes.
- The “Plugged-In Only” Problem: Your HP X360 works perfectly when connected to the charger but dies the instant you unplug it.
- Physical Swelling: A hazardous issue where the failing battery swells, pushing up on the trackpad (making it hard to click) or warping the keyboard. Stop use immediately and get it replaced.
These issues transform a tool of freedom into a source of anxiety. You can no longer confidently take your laptop to a café without hunting for a power socket.
Laptop Battery Replacement DIY Guide 🔋
This guide provides a detailed walkthrough for safely removing your old laptop battery. This process can be delicate on an X360 model. Proceed with caution.
Tools You’ll Need:
- A Phillips-head screwdriver (PH0 or PH1)
- A plastic prying tool or spudger (to avoid scratching your laptop)
- A safe place to keep track of screws (screws are often different lengths)
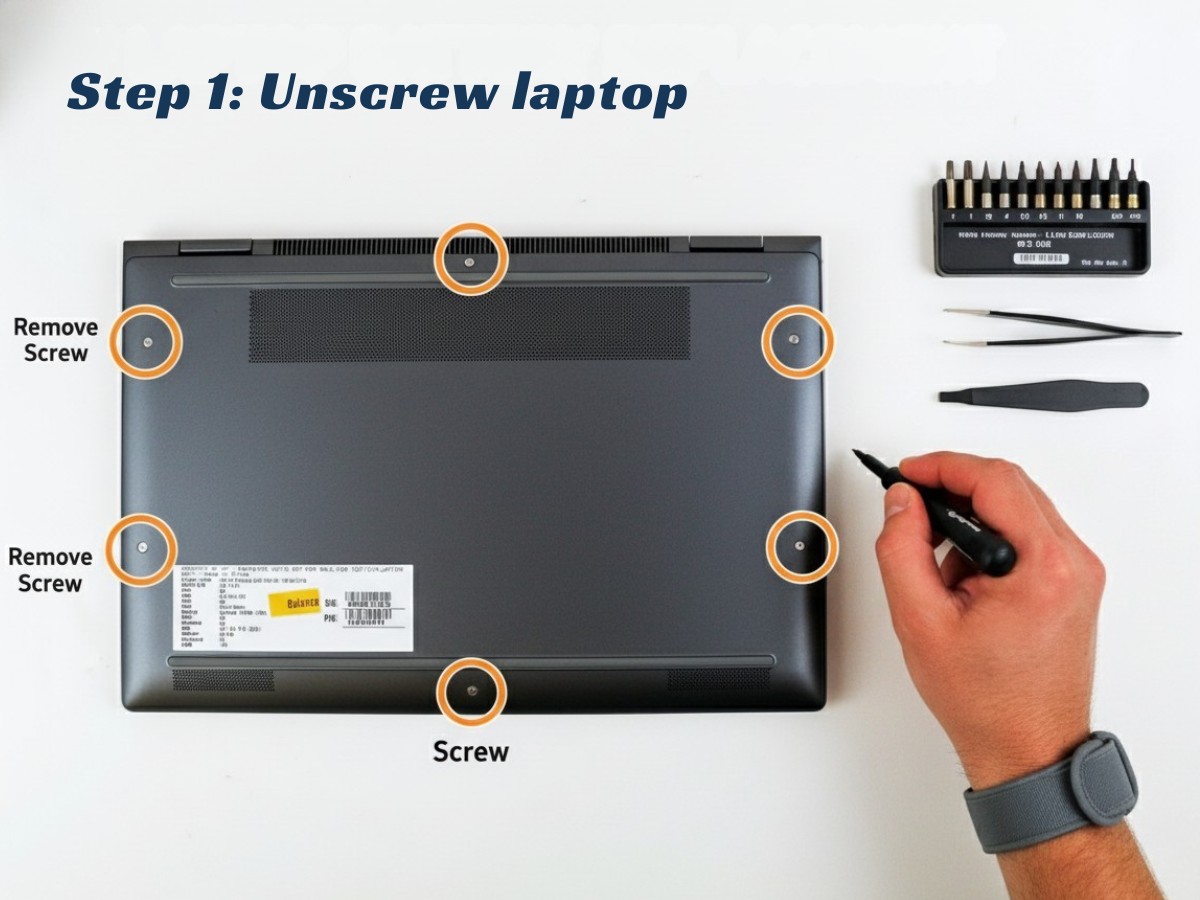
Step 1: Prepare and Open the Laptop
Safety first! Powering down completely is crucial to prevent electrical damage.
- Power Down: Completely shut down your laptop. Do not just put it to sleep. Unplug the charging cable.
- Flip It Over: Close the laptop lid and place it upside down on a soft, non-scratch surface.
- Check Rubber Feet: On almost all Pavilion X360 models, there are screws hidden underneath the long rubber feet. You must gently peel these back (starting from one end) to reveal the hidden screws.
- Remove All Bottom Screws: Unscrew all visible screws and the ones under the feet. Keep them organized, as they are different lengths.
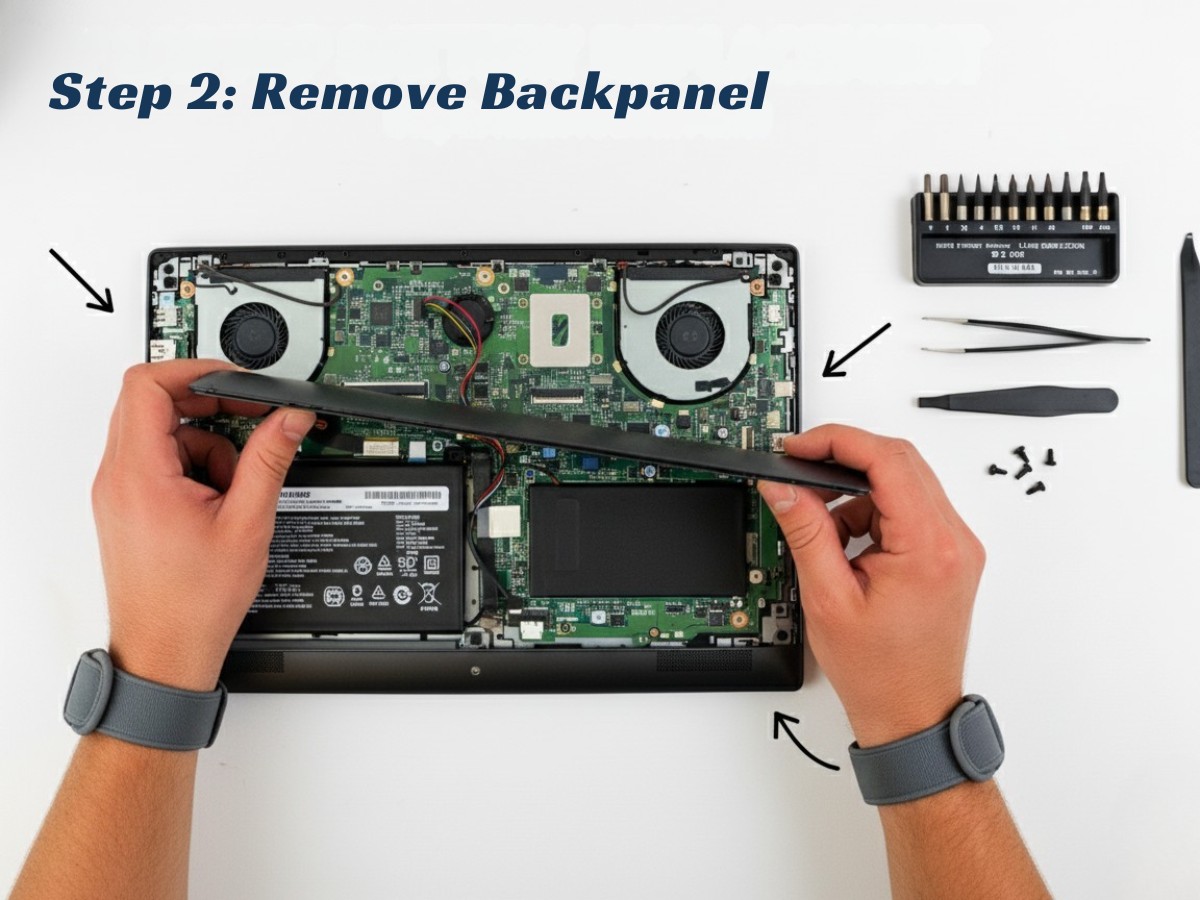
Step 2: Remove the Bottom Cover
This step is delicate. Go slowly.
- Pry Open: Insert a plastic prying tool into the seam between the bottom cover and the main chassis (keyboard deck). It’s often easiest to start at the corners near the hinge.
- Work Your Way Around: Gently slide the tool along the seam to release the plastic clips. You will hear clicking or popping sounds.
- Lift Slowly: Once all clips are loose, lift the bottom cover off and set it aside.
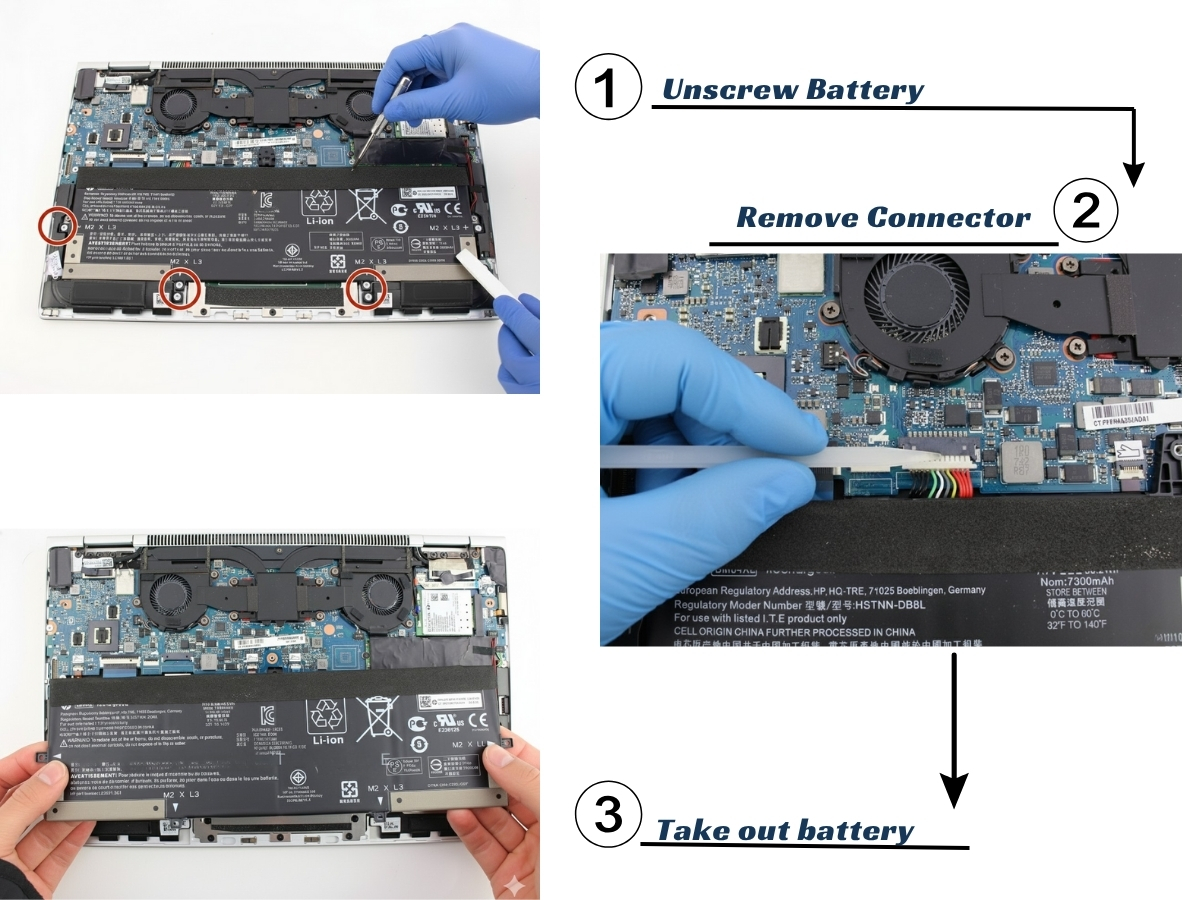
Step 3: Disconnect and Remove the Old Battery
Now that you’re inside, the battery will be the large, flat component.
-
Disconnect the Connector FIRST: Before touching any screws, you must disconnect the battery from the motherboard. It’s a bundled cable with a small connector.
⚠️ Important: Do NOT pull on the wires. Use your plastic tool to gently push the connector plug horizontally out of its socket.
- Unscrew the Battery: Locate and remove all the Phillips-head screws holding the battery in place.
- Lift Out the Battery: Once it’s unscrewed and disconnected, you can carefully lift the old battery out of the laptop.
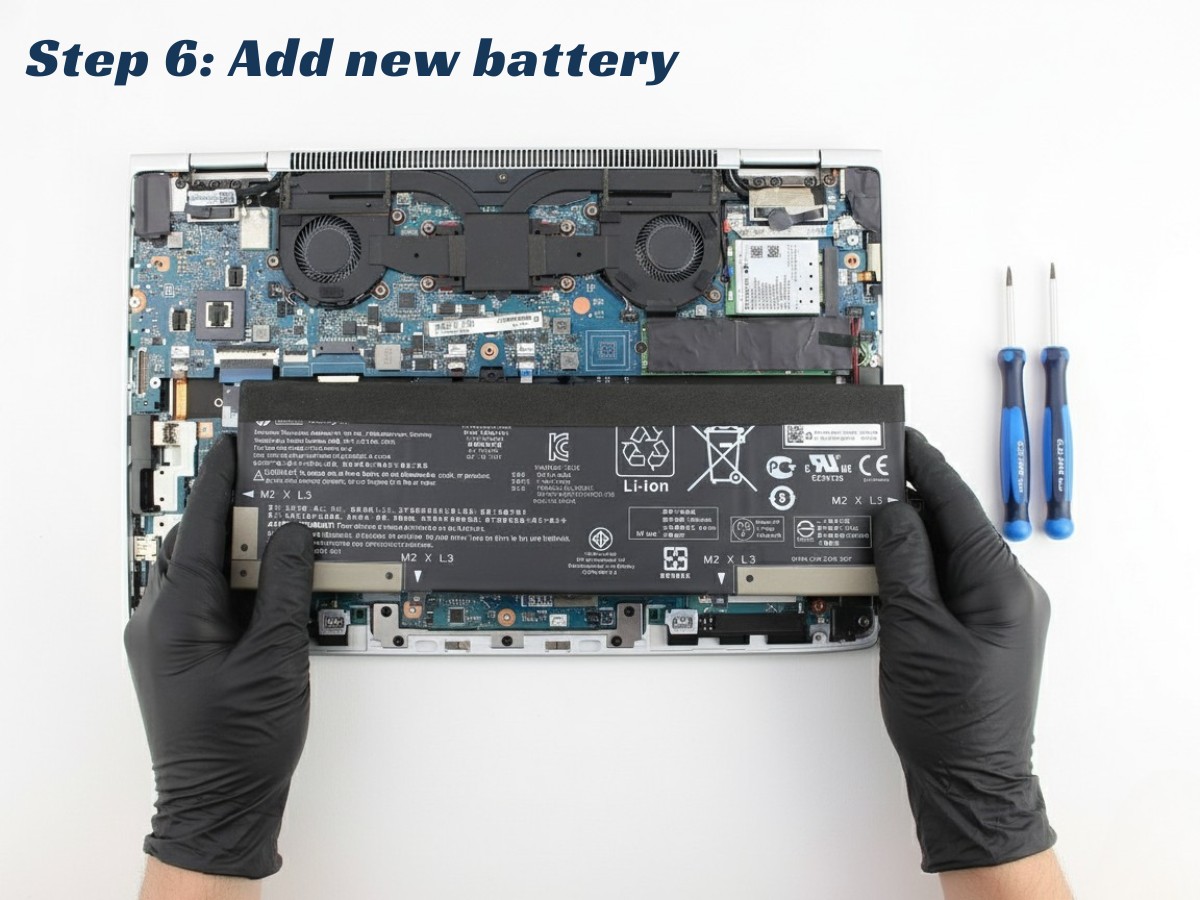
Step 4: Install the New Battery and Reassemble
You’re almost done! Reassembly is just these steps in reverse.
- Position the New Battery: Carefully place your new battery into the same position.
- Secure the Battery: Re-insert the screws to hold the new battery in place (do not overtighten).
- Reconnect the Connector: Align the battery connector with the socket and gently push it straight in until it’s fully seated.
- Replace the Bottom Cover: Position the bottom cover and press down firmly along the edges to snap all the clips back into place.
- Final Screws: Re-insert all the screws (using the correct lengths in their original holes) and press the rubber feet back into place.
Once reassembled, plug in your laptop and power it on. It’s best to fully charge the new battery to 100% before using it on battery power. Great job! 👍
The Starlabs Solution: Restoring Your Pavilion X360’s Freedom
Worried about those hidden screws or delicate ribbon cables? Don’t risk damaging your 2-in-1. Starlabs offers a fast, affordable, and professional HP Pavilion X360 battery replacement service.
Our process is simple and effective:
- Free Diagnosis: We first confirm that the battery is indeed the root cause of the problem.
- Expert Replacement: Our skilled technicians have worked on countless X360 models. We’ll carefully open your device, disconnect the old battery, and install a brand new, high-quality replacement.
- Testing and Calibration: We ensure the new battery is recognized, charges fully, and passes diagnostics before we hand it back.
The result? Your HP Pavilion X360 is a 2-in-1 again. You can work, study, and stream for hours without being chained to the wall. Your laptop’s flexibility is fully restored.
Why Choose Starlabs for Your X360 Battery Replacement?
- We Specialize in 2-in-1s: We have the tools and experience to handle delicate convertible laptops without damaging hinges or ribbon cables.
- Fast, Same-Day Service: We know you need your laptop for school or work. We stock batteries for popular Pavilion models and aim for same-day service.
- High-Quality Parts: We don’t use cheap, unreliable batteries. Our replacements ensure longevity and safety for your device.
- Warranty Included: We stand by our work. All our battery replacements come with a warranty for your confidence.
Ready to flip, draw, and stream with freedom again? Contact Starlabs today to schedule your HP Pavilion X360 battery replacement!