

Lenovo IdeaPad 5 Charging Port Replacement
Your Lenovo IdeaPad 5 is a dependable, high-performance machine… right up until the day it stops charging. If you’re suddenly battling a wobbly plug, a flickering charge light, or a laptop that only charges at a “magic” angle, you’ve found the right place. This is a fixable problem, and at StarLabs, we offer an expert, affordable repair service right here in Singapore.
Before you panic and start shopping for a new laptop, let’s dive into the problem and the best solutions available for your IdeaPad 5.
The Lenovo IdeaPad 5’s Charging Port Problem
The IdeaPad 5 is part of Lenovo’s mainstream lineup, prized for offering premium features like an all-metal build and strong performance at a great price. It’s built to be a daily driver, which means its ports—especially the charging port—see constant use. Day after day, plugging and unplugging puts mechanical stress on this single, small component, leading to its eventual failure.
Whether you’re using the traditional round “DC-in” jack or a modern USB-C port for charging, both are susceptible to wear and tear. A sudden yank on the cord or simple long-term use can break the internal connections, leaving you with a very expensive paperweight.
Is Your Charging Port Broken? Symptoms & Causes
How do you know if it’s the port and not just a bad charger? Here are the classic signs.
Telltale signs of failure:
- You’ve already tried a new, working charger, and the problem persists.
- The plug itself feels loose or wobbly inside the port.
- The charging light or screen icon flickers when you touch the cable.
- You can see physical damage, like a bent pin or cracked plastic, inside the port.
- The laptop won’t charge at all, no matter what you do.
Cabled Port vs. Soldered Port: A key difference on the IdeaPad 5
Different versions of the Lenovo IdeaPad 5 have two different types of ports:
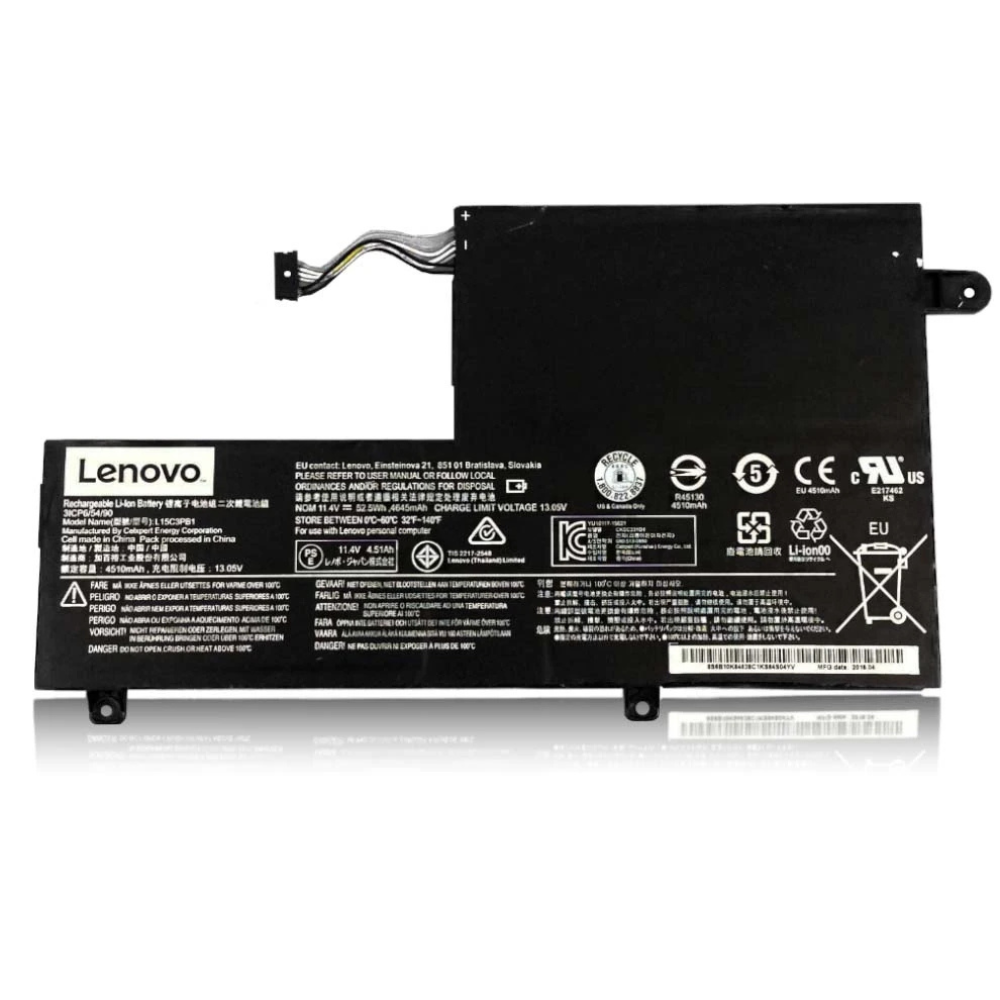
- Cabled DC-in Jack: This is a small component connected to the motherboard by a simple wire and plug. It’s designed to be replaceable.
- Soldered USB-C Port: This port is bonded directly to the laptop’s main motherboard with many tiny pins. Replacing it requires specialized micro-soldering tools and expertise.
Official service centres often won’t differentiate. For either problem, their solution is to replace the entire motherboard. This is the “expensive trap” that can cost $600, $800, or more. At StarLabs, we can replace just the broken port, whether it’s cabled or soldered, saving you a fortune.
Your Repair Options in Singapore
You have three main choices when your IdeaPad 5 stops charging:
- Official Service Centre: They will likely quote you for a full motherboard replacement, especially if your warranty is expired. This is the most expensive option.
- DIY Repair: If you have a cabled port (as shown in the guide below), a DIY repair is possible. However, it requires technical skill, the right tools, and the risk of damaging other components. If your port is soldered, DIY is not recommended at all.
- StarLabs (Your Best Choice): Bring it to us for a free diagnosis. We’ll identify the exact problem and give you a low-cost quote to replace *only the port*. It’s fast, safe, and backed by a warranty.
A Look at the DIY Charging Port Replacement Process
StarLabs – Singapore’s home of DIY spare parts
This guide shows the process for a model with a cabled charging port. If your IdeaPad 5 has a soldered USB-C port, this process will not work and we strongly advise against a DIY attempt.
Tools & prep
- Torx T5 & Phillips #0 screwdrivers
- Plastic spudger
- Replacement Lenovo charging port (grab it at StarLabs)
- Small bowl for screws
- Soft towel
STEP 1 – Power-down & pad-up
Shut Windows, unplug the charger, and close the lid. Lay the laptop upside-down on a towel so the lid and palm-rest never meet scratches. Press the power button 5 s to discharge leftover juice.
Pro tip: Take a phone photo of the screw layout; two screws near the hinge are longer-you’ll thank yourself at re-assembly.
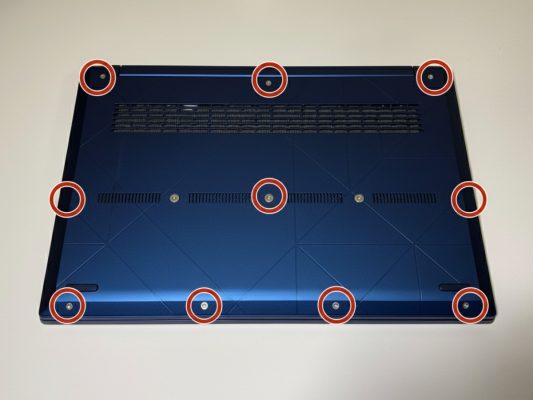
STEP 2 – Release the bottom cover
Undo the ten 6 mm Torx screws; drop them in your bowl. Slide a plastic spudger into the rear seam (right above the hinges) and twist gently. You’ll hear tiny “pops” as plastic clips let go-normal. Work around the entire edge until the cover lifts off like a lid on a cookie jar.
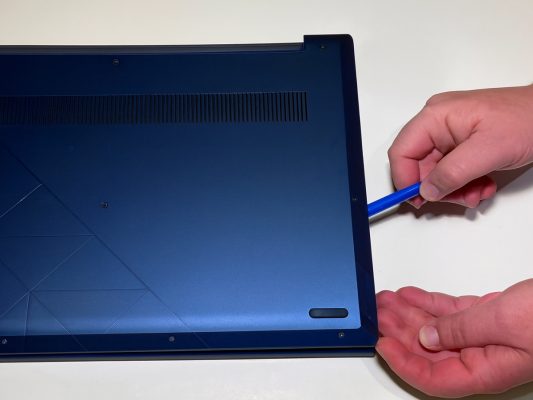
! Warning: Don’t yank; the speaker wires are still attached to the shell on some Lenovo units.
STEP 3 – Kill all power by unplugging the battery
Spot the white battery connector on the motherboard. Grip the plug, not the wires, and pull straight out-parallel to the board. The socket has no latch, so a smooth tug is all it takes.
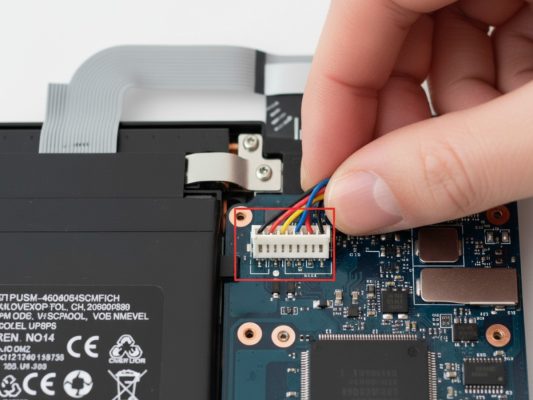
Why this matters: Even when the laptop is “off” the board still has 8 V wandering around; removing the connector prevents accidental shorts.
STEP 4 – Swing the hinge bracket out of the way
Remove the three silver 6 mm Phillips screws along the right screen hinge. Carefully flip the metal hinge upward; it pivots like a trapdoor and reveals the little black rectangle where the charging-port cable hides.
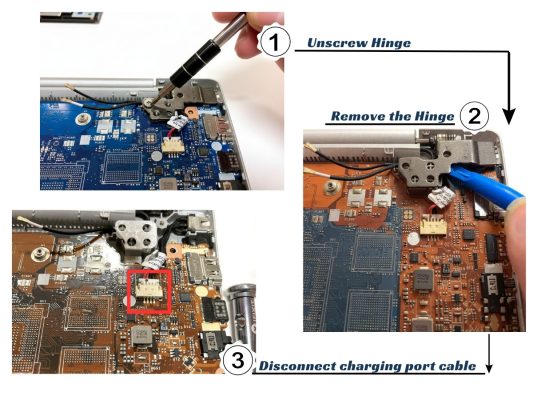
Pro tip: If the hinge resists, loosen the two neighbouring keyboard screws half-a-turn-this releases tension.
STEP 5 – Out with the old charging jack
Slide the tiny charging-port plug straight out of the motherboard socket (no rocking). Grab the rubber collar at the base of the old jack and lift vertically; the whole assembly pops free from the chassis cut-out.
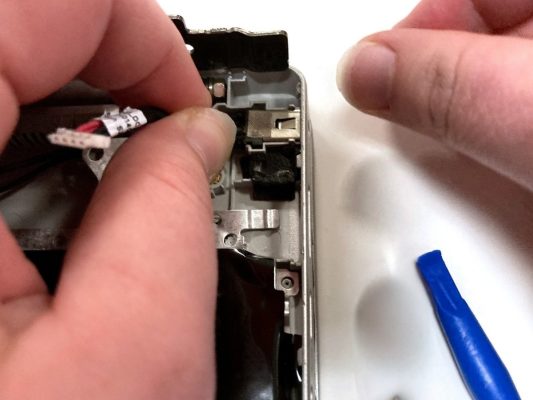
Fish the new Lenovo charging port through the same slot, press the rubber until it sits flush, then click the plug into the socket until you feel it seat-no half gaps allowed.
STEP 6 – Rebuild in reverse
Lower the hinge bracket, reinstall the three Phillips screws, reconnect the white battery cable (light push until fully home), and snap the bottom cover on. Return the ten Torx screws to their original holes-remember the two longer ones go nearest the hinges.
Give every screw a gentle final tighten; snug, not Hulk-level.
STEP 7 – The 10-second victory test
Plug in your charger: LED should glow steady amber or white. Power on the laptop, then deliberately wiggle the connector. No flicker? You just saved $150 in service fees.
Still loose? Pop the cover again and ensure the new jack’s plastic tabs are fully clipped into the chassis.
StarLabs: The Professional Fix for Your IdeaPad 5
Don’t risk your laptop. Get a guaranteed, professional repair.
That DIY guide looks complex for a reason. It’s a delicate operation. One lost screw or a slip of the tool can lead to a much bigger, more expensive problem. And if your Lenovo IdeaPad 5 uses a soldered USB-C port, the risk is even higher. That’s a job that requires micro-soldering expertise.
At StarLabs, we have the tools and technicians to handle both types of repairs safely. We will replace just the faulty port on your IdeaPad 5—not the whole motherboard. This is the fast, affordable, and risk-free way to get your laptop charging perfectly again.
Why StarLabs is Singapore’s Choice for Laptop Repair
We are your one-stop-shop in Singapore for all your device repair needs.
- Free Diagnosis: Not sure what’s wrong? Bring your device in for a 100% free, no-obligation diagnosis. We’ll tell you the exact problem and the cost to fix it.
- One-Day Repairs: We stock parts for most common issues. For repairs like charging port replacement, battery replacement, and screen replacement, we can often have your laptop back to you within one day.
- 6-Month Repair Warranty: We confidently stand by our work. All our repairs are covered by a 6-month warranty on the parts we’ve replaced and the service performed.
- We Fix Everything: Our expertise doesn’t stop at charging ports. We are specialists in all laptop and phone repairs, including:
- Motherboard Repair (Component Level)
- Water Damage Cleaning & Repair
- Fan Replacement & Overheating Issues
- Software Problems & Virus Removal
- Keyboard & Trackpad Replacement
- Screen & Hinge Repair